Javascript at the command-line
(AP note September 2021: this is SUPER out of date, sorry!)
In this tutorial, I’m going to teach you a little bit about Node.js. Node.js is a version of Javascript that you can use in places other than a web browser. Programmers often use Node to write software like web servers or web APIs, or other kinds of software that don’t need to be interactive in real time or present sophisticated user interfaces (so-called “back-end” or “systems” programming).
I’m going to show you how to use Node to do some basic text processing. We’ll
use the RiTaJS library to make a Node program that produces generative poetry,
and then we’ll write a web server that serves up randomly generated strings.
Finally, I’ll show you how to use a Node module called node-twitter-api to
write a program that posts Twitter updates.
The goal of the tutorial isn’t to make you a Node expert, but to give you an overview of the basics so that you have the literacy you need to dig deeper on your own.
The examples for this tutorial are here.
Node vs. p5.js
Both Node and p5.js are programming frameworks that make use of Javascript. But that’s where the resemblance between the two ends. The p5.js framework is for writing interactive applications that run in the browser; Node is for writing back-end applications that run directly as programs on any computer, without the aid of a browser. When you’re writing programs in Node, you’re still writing Javascript, but you won’t have access to any variables, functions or libraries that are specific to p5.js. (Basically, anything listed here.)
Programs written for Node and programs written for p5.js are also different structurally. Most of the p5.js programs we’ve written have two phases: a “setup” phase, for loading resources, initializing variables, etc., and a “draw” phase, which runs over and over again, drawing shapes to the screen and reacting to user input. Node programs, by default, work differently: there’s no “draw” function that gets called over and over again. The statements you write are executed one at a time until there are none left and the program exits. (Though see the web server example below for an important exception to this!)
Another important difference between p5.js and Node is how you write and run programs. We’ve been using the p5.js editor to write p5.js programs, and then distributing them to others by uploading them to the web. When writing Node programs, you’ll use a text editor like TextWrangler or Sublime Text to write the programs, and then run them from the command line using the Terminal application (assuming you’re using OS X). I’ll explain more about this below!
Installing Node
Go to nodejs.org and follow the instructions for your platform.
Using the Node REPL
(This section assumes you’re using Mac OS X! Here’s a good introduction to installing and using Node on Windows.)
Open the Terminal application. (You’ll find this in Applications > Utilities,
or you can search for “Terminal” using Spotlight.) The Terminal application
displays what’s known as the “command line”; think of this as sort of a
low-level interface to your computer, where instead of moving your mouse around
and clicking on things, you type commands directly. In this tutorial,
we’re only going to use a handful of commands—don’t worry, the command line
looks intimidating, but there’s not much to it if you’re just running Node
programs.
When you first start the Terminal application, you’ll see a prompt (usually
ending with a $) and then a cursor. Your job is to type a command, which
will cause your computer to run a particular program on your computer.
Sometimes those programs will run instantaneously; sometimes they’ll “take
over” the Terminal window for a while and wait for further input.
The first program you’re going to run what’s called the Node REPL. “REPL”
stands for “read-evaluate-print-loop”; it’s a special interface to Node that
allows you to type Javascript expressions and see the result of evaluating
those expressions. To run the REPL, just type node at the command line.
You’ll see a new prompt appear—this time, a > instead of a $. As long as
the prompt is >, you can type Javascript expressions and see what they
evaluate to (sort of like a calculator). To exit the REPL, type .quit and
press Enter, or hit Ctrl+D.
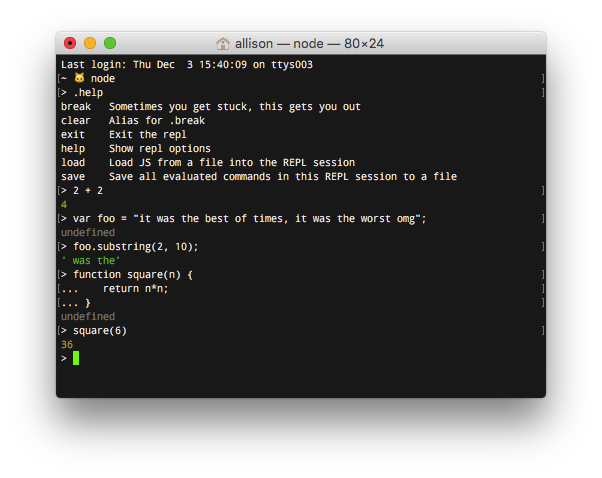
Here’s a sample REPL session:

Creating a program
A Node program consists of a series of Javascript statements. You can create a Node program using a text editor like TextWrangler or Sublime Text.
Copy the following into a text editor and save it somewhere as hello.js. (You
probably want to save it into a new, empty folder.)
var greetings = ["hello", "greetings", "hey there", "hi", "howdy"];
var places = ["city", "country", "world", "solar system", "galaxy"];

function choice(t) {
    return t[Math.floor(Math.random()*t.length)];
}

for (var i = 0; i < 10; i++) {
    console.log(choice(greetings) + ", " + choice(places));
}
In order to run this program, you need to change the current working
directory of your command line session to the directory where you saved the
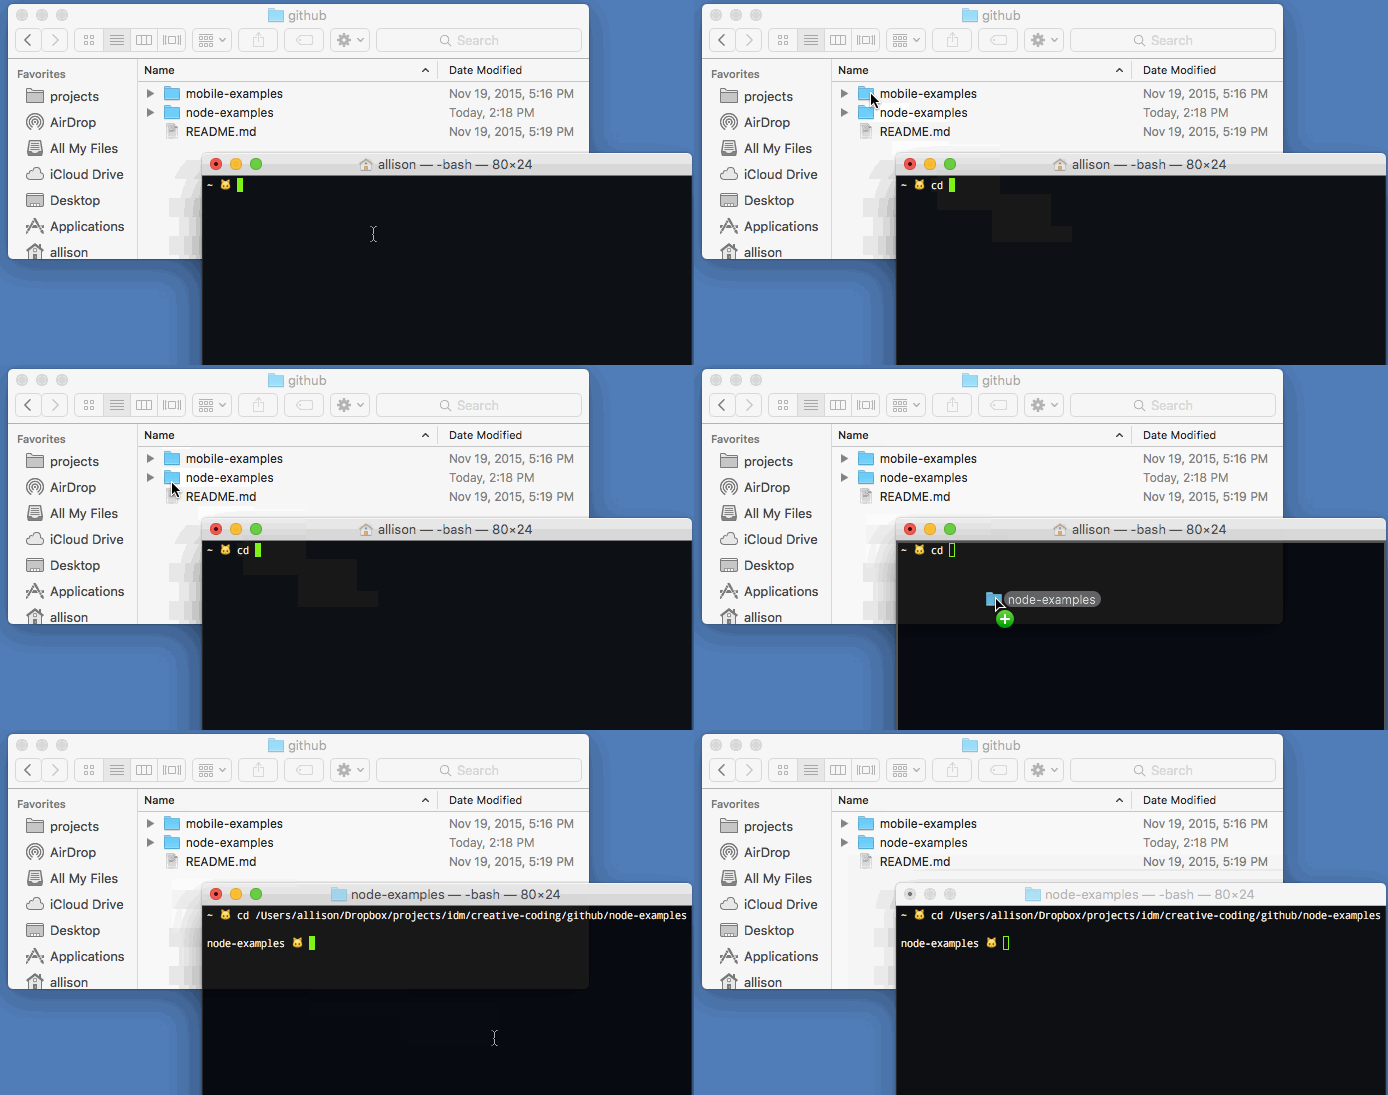
file. To do this, type cd in a new Terminal window (note the space after the
letters cd!)—don’t hit Enter yet!—and then find the folder where the file
is saved in the Finder. Drag the folder from the Finder to the Terminal window.
The path name of the folder should appear in the Terminal window. Now press
Enter.

To run the program, type node followed by the filename of the program (in this case, hello.js. You should see something that looks like this:
$ node hello.js
hey there, solar system
greetings, solar system
hey there, world
howdy, solar system
greetings, world
hi, city
hey there, city
howdy, solar system
hi, country
greetings, world
$
Built-in Node modules
- Using the fs module
require()
Here’s documentation on all of the modules included with Node.
Installing modules with npm
NPM is the global repository for Node modules. Node modules are code libraries that provide pre-built functionality that you can re-use in your own Node programs. Modules are contributed by thousands of programmers from across the world. Installing any of these modules is as easy as typing a few words on the command line. It is pretty great!
Create a project with npm init
Before you can install modules from npm, you’ll probably want to create a
package.json file. This is a special configuration file that holds
information about your project—and, importantly, a list of the modules that
you’ve installed as part of the project. The easiest way to create a
package.json file is to type the following on the command line:
npm init --yes
The default package.json file produced like this is fine, but you’ll
eventually want to customize its contents. This is a good
resource for learning what the different
parts of the file mean.
npm install
To install a module, locate the desired module on npm and remember its name.
Then type
npm install <module_name> --save
… on the command line in your project directory, replacing <module_name>
with the name of the module you want to install. For the next few examples,
we’re going to use the npm module supplied by RiTaJS, which you can install
like so:
`npm install ritajs --save`
After doing this, examine the package.json file. You’ll see that it’s been
updated with a dependencies key that lists the rita library you’ve just
installed. You’ll also notice a new node_modules directory; npm creates this
automatically to store and manage all of the modules that you’ve installed.
(Don’t mess with this!)
Installing all dependencies for a project
- npm install w/o arguments
Command-line poetry generator with RiTaJS
- markov chain generator (make sure you have
genesis.txtdownloaded and in your project directory!) - aleph
A simple web server
Post to Twitter with node-twitter-api
npm install node-twitter-api- obtaining tokens
- post markov to twitter