Expressions, variables and loops
In the previous tutorial, I showed you how to download p5.js and make your first sketch. In this tutorial, I’m going to show you a few fundamental concepts of computer programming: expressions, variables, and loops.
Expressions
In the sketches in the previous tutorial, I showed you how to call functions
(like ellipse) with parameters. The parameters were all numbers, like 100
or 300 and so forth. Numbers like 300 or 150 in Javascript are called a
value. (Later in the class, I’ll show you types of values that aren’t
numbers, but for now, let’s just assume that we’ll only be working with numeric
values). In all of the sketches in the previous tutorial, each of the functions
was called with individual values for parameters.
Individual values are fine, but they’re only the beginning of the story. It turns out that anywhere you find an individual value in Javascript, you can also write something called an expression. An expression is a way to make a new value by combining other values with operators.
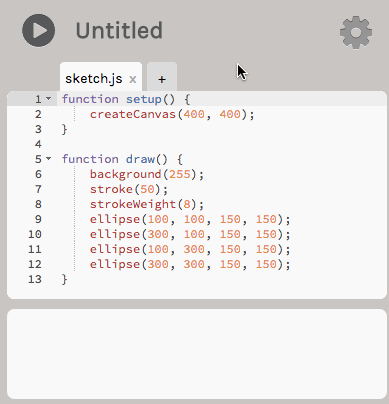
I’ll talk more about how this works in a second. But first, let’s look at an example. Here’s a basic sketch that draws four circles:
function setup() {
    createCanvas(400, 400);
    noLoop();
}

function draw() {
    background(255);
    fill(255);
    stroke(50);
    strokeWeight(8);
    ellipse(100, 100, 150, 150);
    ellipse(300, 100, 150, 150);
    ellipse(100, 300, 150, 150);
    ellipse(300, 300, 150, 150);
}
Simple so far. But any of these numerical values can be replaced by an
expression. In its simplest form, an expression consists of an operator,
with two values, one to the left of the operator and one to the right.
For example, here’s the same sketch, but using the addition operator (+) to
change the Y position of each of the ellipses by 50 pixels:
function setup() {
    createCanvas(400, 400);
    noLoop();
}

function draw() {
    background(255);
    fill(255);
    stroke(50);
    strokeWeight(8);
    ellipse(100, 100 + 50, 150, 150);
    ellipse(300, 100 + 50, 150, 150);
    ellipse(100, 300 + 50, 150, 150);
    ellipse(300, 300 + 50, 150, 150);
}
Where I wrote 100 + 50 in that example is an example of an expression: two
values, combined with an operator. The operator in this case was +, but all
of the familiar mathematical operators from your childhood arithmetic days are
supported, though some of them are written in unintuitive ways:
| name | operator |
|---|---|
| addition | + |
| subtraction | - |
| multiplication | * |
| division | / |
Here’s another sketch that plays around a bit with these operators:
function setup() {
  createCanvas(400, 400);
  noLoop();
}

function draw() {
  background(255);
  fill(255);
  stroke(50);
  strokeWeight(8);
  ellipse(100, 100 + 50, 150, 150);
  ellipse(300 - 25, 100, 150, 150);
  ellipse(100, 300 + 50, 150 / 3, 150);
  ellipse(300, 300, 150 * 2, 150);
}
The multiplication operator is written with * and the division operator with
/ (if you’re used to doing arithmetic or algebra, you can imagine that / as
being sort of like the regular horizontal division bar, just tilted onto its
side. The dividend goes on the left and the divisor on the right.)
If you’re a newcomer to programming, the example above probably looks horribly weird and complicated. Here’s how to read one of these lines without feeling like you’re looking into a wretched pool of punctuation madness. For a line like this:
ellipse(100, 300 + 50, 150 / 3, 150);
Here’s how to read it out loud:
- This is a call to the
ellipsefunction. - In function calls, parameters are separated by commas. There are three commas inside the parentheses, so there must be four parameters. (Commas only go between parameters, so there will be one fewer comma than parameters.)
- The parameters to the function, then, are
100,300 + 50,150 / 3, and150. 100and150are just plain values, but300 + 50and150 / 3are expressions. Javascript will turn these expressions into values when the sketch is running (the resulting values will be350and50, respectively).- The order of the parameters matters, but you don’t know which position has what meaning without consulting the documentation. Looking at the documentation reveals that the first parameter is the X position, the second parameter is the Y position, the third parameter is the width, and the fourth parameter is the height.
- So, this line of the code will result in an ellipse being drawn at X position 100, y position 350, with a X diameter of 50 and a Y diameter of 150. (Which is exactly what you see in the sketch!)
The process of turning an expression into a single value is called evaluation. Whenever you put an expression in your program, Javascript evaluates it in order to turn it into a value.
Note that the spaces before and after the operator are optional. This:
300 + 50
… means exactly the same thing as this:
300+50
Each programmer decides for themselves which style is more appropriate for them. (Personally I tend to switch between the two, depending on the context.)
Using p5.js as a calculator
Right now you’re probably saying, “Wait, why should I write 300 + 50 in my
program instead of just, you know, 350? I already know what 300 + 50 is.”
And you’re right, the examples above aren’t particularly useful. Operators are
mostly useful with variables, which we’ll discuss below. But in the mean
time, I want to show you how you can use p5.js as a calculator. Say you have
some arithmetic expression that is difficult to figure out by hand, like
427 * 54
You can use p5.js to calculate this! Simply start a new sketch in the web
editor, and paste this code somewhere between the { and } following
function setup():
console.log(427 * 54);
You can type any expression you want between the parentheses. When you press the run button, the sketch window will be empty, but the result of the expression will be displayed in the “Debug” area beneath the code panel. (It will also show up in your browser’s JavaScript console, which might be a more reliable place to find it!)
The console.log() function is a special function that doesn’t draw anything
to the screen: its only purpose is to display the result of evaluating
expressions to the debug area. (You’ll learn later how useful this can be for
the purposes of identifying and diagnosing errors in your programs.)
More complex expressions and order of operation
An operator can have a value on either side of it, but it can also have another expression to either side. There’s no real limit to the number of embedded expressions that you can include in an expression that evaluates to a single value.
To use an expression as part of another expression, surround that expression in parentheses. For example:
console.log(4 + (5 * 6));
The expression in this bit of code is 4 + (5 * 6), which translates to:
“Perform an addition operation. Add the value four to the result of multiplying
5 times 6.” (The result is 34.)
Even more complex:
console.log((18 / 3) - (3 + 2));
Here, we’re subtracting the result of 3 + 2 from the result of 18 / 3.
Internally, Javascript performs these operations in a manner similar to how you
would perform this operation by hand, by going from left to right, locating any
expressions inside of parentheses and evaluating them. The steps of evaluation
look something like this:
- (18 / 3) - (3 + 2)
- 6 - (3 + 2)
- 6 - 5
- 1
Exercise: What do you think the expression
((1 + 2) * (3 + 4)) / (9 - 2)would evaluate to? Try to work it out by hand first, and then check usingconsole.log()to evaluate your guess. How would you characterize Javascript’s rules for evaluating expressions embedded within other expressions?
If you leave out the parentheses, Javascript tries its best to guess the order in which to evaluate parts of the expression. It uses the same rules that you learned in arithmetic: PEMDAS (parentheses, exponents, multiplication, division, addition, subtraction). So, for example, in the following expression:
4 + 5 * 6
Javascript evaluates the multiplication first (5 * 6) and the addition second
(4 + 30), resulting in 34. To get Javascript to evaluate the addition first,
you need to surround that expression in parentheses:
(4 + 5) * 6
… which evaluates to 54 (nine times six).
Personally, even though Javascript has okay rules about deciding what order to perform operations in, I find that my programs end up being less error-prone if I always use parentheses to disambiguate the order of operations.
Variables
Now that you have an understanding of values and expressions, I can start explaining one of the most powerful concepts in computer programming: variables.
Changing values with search and replace
To explain variables, let’s return to the four circles example from earlier. Here’s the sketch again:
function setup() {
    createCanvas(400, 400);
    noLoop();
}

function draw() {
    background(255);
    fill(255);
    stroke(50);
    strokeWeight(8);
    ellipse(100, 100, 150, 150);
    ellipse(300, 100, 150, 150);
    ellipse(100, 300, 150, 150);
    ellipse(300, 300, 150, 150);
}
Looks good. But ugh, those circles are so big! I want them to be
smaller—let’s say, 100 pixels in diameter instead of 150. But there are so
many 150s to change! Life is too short to go through and change them all by
hand, so instead I’m going to use the search and replace function.
Okay, that seems to have worked…
function setup() {
    createCanvas(400, 400);
    noLoop();
}

function draw() {
    background(255);
    fill(255);
    stroke(50);
    strokeWeight(8);
    ellipse(100, 100, 100, 100);
    ellipse(300, 100, 100, 100);
    ellipse(100, 300, 100, 100);
    ellipse(300, 300, 100, 100);
}
But now… huh. They’re too small. Actually, I think I was wrong to begin
with, and even 150 pixels was too small. Let’s go for broke and make those
circles 200 pixels wide. All I need to do to make this change is just search
and replace 100 with 200, right? Let’s see…
function setup() {
    createCanvas(400, 400);
    noLoop();
}

function draw() {
    background(255);
    fill(255);
    stroke(50);
    strokeWeight(8);
    ellipse(200, 200, 200, 200);
    ellipse(300, 200, 200, 200);
    ellipse(200, 300, 200, 200);
    ellipse(300, 300, 200, 200);
}
Oh wait. Whoops. That’s not right. What happened?
Well, it turns out that 100 was not just the new value for the diameter of
the circle, it was also the value for some of the X/Y coordinates of the
circle. So when I tried to change that value with search and replace, I
accidentally changed those values too. Troublesome. Problematic! Now my
circles are all weird and I hate life.
Variables to the rescue
So, think a bit about how you would solve this problem. Basically: you want to be able to use the same value in multiple function calls, and if later you want to change that value, you want to only have to update it in one place, instead of everywhere in your sketch. It would be great if there were a way to tell Javascript something like, “Hey, I know usually you want me to type a number or an expression here as a function parameter. But actually, instead of looking in the function call for that number, look somewhere else. I made this post-it note over here labelled ‘diameter’ and it has a number written on it, and I know it’s a lot to ask because you’re a computer, but maybe you can just look at the post-it note and get the value from there instead of me having to type the number over and over again.”
It turns out that there is a way to make Javascript do this, and it’s called a variable.
Well, not exactly this: there’s no post-it note. But you can include a special line in your program that gives a particular value a name, and then you can use that name in your program to refer to that value, instead of typing the value itself. Here’s what it looks like:
let diameter = 200;

function setup() {
  createCanvas(400, 400);
  noLoop();
}

function draw() {
  background(255);
  fill(255);
  stroke(50);
  strokeWeight(8);
  ellipse(100, 100, diameter, diameter);
  ellipse(300, 100, diameter, diameter);
  ellipse(100, 300, diameter, diameter);
  ellipse(300, 300, diameter, diameter);
}
The line at the very top of the sketch—even before function setup() { is a
variable declaration. A variable declaration has the following format:
- the keyword
let, followed by - the name of the variable (you get to pick this!), followed by
- an equals sign (
=), follwed by - an expression whose value you want to “assign” to the variable.
So in this sketch, I set a variable called diameter to the value 200. And
everywhere in the sketch that I wanted to use this value, I wrote diameter
instead of writing the value itself. Now, if I want to change the value of
the diameter, I only need to make the change in one place:
let diameter = 40;

function setup() {
  createCanvas(400, 400);
  noLoop();
}

function draw() {
  background(255);
  fill(255);
  stroke(50);
  strokeWeight(8);
  ellipse(100, 100, diameter, diameter);
  ellipse(300, 100, diameter, diameter);
  ellipse(100, 300, diameter, diameter);
  ellipse(300, 300, diameter, diameter);
}
You can include as many variables in your program as you’d like. Let’s say I want to be able to control the height and width of the ellipses independently. In that case, I might make two variables, one for the height, and one for the width:
let ellHeight = 40;
let ellWidth = 80;

function setup() {
  createCanvas(400, 400);
  noLoop();
}

function draw() {
  background(255);
  fill(255);
  stroke(50);
  strokeWeight(8);
  ellipse(100, 100, ellWidth, ellHeight);
  ellipse(300, 100, ellWidth, ellHeight);
  ellipse(100, 300, ellWidth, ellHeight);
  ellipse(300, 300, ellWidth, ellHeight);
}
Let’s play around with it a bit:
let ellHeight = 250;
let ellWidth = 110;

function setup() {
  createCanvas(400, 400);
  noLoop();
}

function draw() {
  background(255);
  fill(255);
  stroke(50);
  strokeWeight(8);
  ellipse(100, 100, ellWidth, ellHeight);
  ellipse(300, 100, ellWidth, ellHeight);
  ellipse(100, 300, ellWidth, ellHeight);
  ellipse(300, 300, ellWidth, ellHeight);
}
Note that there is nothing special about the variable names diameter,
ellWidth and ellHeight. You get to pick the names of the variables, and
it’s common practice to pick names that have some mnemonic meaning for you, so
it’s easier to keep track of what feature of the sketch each variable is
connected to. But there’s nothing stopping you from doing something like:
let marriageability = 250;
let b7GxQrTto9 = 110;

function setup() {
  createCanvas(400, 400);
  noLoop();
}

function draw() {
  background(255);
  fill(255);
  stroke(50);
  strokeWeight(8);
  ellipse(100, 100, b7GxQrTto9, marriageability);
  ellipse(300, 100, b7GxQrTto9, marriageability);
  ellipse(100, 300, b7GxQrTto9, marriageability);
  ellipse(300, 300, b7GxQrTto9, marriageability);
}
As long as you make sure to use exactly the same spelling (matching upper and lowercase), your variable names will work regardless of what you call them.
You can see why it might be preferable to use variable names that remind you of what you’re going to use them for. But it’s not necessary. The sky and your imagination… are your only limit.
Naming variables
When you’re naming something in real life, you can use whatever combination of letters, numbers and punctuation you want. Javascript doesn’t care about what your variable names mean, but it does care about what individual characters make up the variable name. The rules for Javascript variable names are as follows:
- Your variable name must begin with a letter (lowercase or uppercase A through Z).
- After the first letter, the name can consist of letters, numbers or
underscores (
_) - A variable name can be as short as a single character, and can be as long as you want it to be (but please exercise restraint).
Additionally, there are several reserved keywords in Javascript, which you cannot use as variable names. You can read a full list of these words here.
You also should use the name of any built-in p5.js variable or function name.
(E.g., don’t name a variable ellipse.) See the p5.js reference for a full
list.
Errors with variables
The main problem you’re likely to run into with variables is accidentally
failing to type the name of a variable consistently—i.e., you call it one
thing in the declaration, but something else when you use it. When you do this,
Javascript will give you an “Uncaught ReferenceError” error message, which
means that you typed the name of a variable that Javascript didn’t recognize.
The 6 in the screenshot above tells you on which line of your sketch
Javascript thinks the problem occurred.
Variables and expressions
Okay, so, variables. You get it. They’re values that you give a name to, and then you can use that name in your sketch instead of the original value, which makes it easier to change that value later, since you only have to make the change in one place. Cool. Nice.
But the power of variables is that you can use them in any context that you
would normally need to write a value. This means that you can use variables
in expressions. For example, here’s our four circles sketch again, but this
time using the diameter variable in an expression to vary the sizes of the
circles slightly, from one circle to the next:
let diameter = 100;

function setup() {
  createCanvas(400, 400);
  noLoop();
}

function draw() {
  background(255);
  fill(255);
  stroke(50);
  strokeWeight(8);
  ellipse(100, 100, diameter, diameter);
  ellipse(300, 100, diameter+25, diameter+25);
  ellipse(100, 300, diameter+50, diameter+50);
  ellipse(300, 300, diameter+75, diameter+75);
}
The “base” diameter of each circle is set by the variable, which means that we can change it and still get similar-looking results just by modifying the variable:
let diameter = 25;

function setup() {
  createCanvas(400, 400);
  noLoop();
}

function draw() {
  background(255);
  fill(255);
  stroke(50);
  strokeWeight(8);
  ellipse(100, 100, diameter, diameter);
  ellipse(300, 100, diameter+25, diameter+25);
  ellipse(100, 300, diameter+50, diameter+50);
  ellipse(300, 300, diameter+75, diameter+75);
}
You can also use variables that have been previously declared to set the initial value of the variable in its declaration. Let’s say that we want each ellipse’s height to be exactly twice its width. Here’s how to write that:
let ellWidth = 110;
let ellHeight = ellWidth * 2;

function setup() {
  createCanvas(400, 400);
  noLoop();
}

function draw() {
  background(255);
  fill(255);
  stroke(50);
  strokeWeight(8);
  ellipse(100, 100, ellWidth, ellHeight);
  ellipse(300, 100, ellWidth, ellHeight);
  ellipse(100, 300, ellWidth, ellHeight);
  ellipse(300, 300, ellWidth, ellHeight);
}
You can change the ellWidth value and the proportions of the ellipse remain
the same, without having to fiddle with the value of ellHeight:
let ellWidth = 50;
let ellHeight = ellWidth * 2;

function setup() {
  createCanvas(400, 400);
  noLoop();
}

function draw() {
  background(255);
  stroke(50);
  strokeWeight(8);
  ellipse(100, 100, ellWidth, ellHeight);
  ellipse(300, 100, ellWidth, ellHeight);
  ellipse(100, 300, ellWidth, ellHeight);
  ellipse(300, 300, ellWidth, ellHeight);
}
Here’s a sketch that puts it all together: it draws a row of five rectangles,
using variables and expressions to introduce variations to each rectangle. You
can fiddle with the variables to change how it looks, without messing with the
actual code in the draw() function.
let fillG = 100;
let fillstep = 25;
let xpos = 50;
let ypos = 100;
let xstep = 50;
let ystep = xstep / 2;

function setup() {
  createCanvas(400, 400);
  noLoop();
}

function draw() {
  background(255);
  noStroke();

  fill(200, fillG, 200);
  rect(xpos, ypos, 100, 100);

  fill(200, fillG+fillstep, 200);
  rect(xpos+xstep, ypos + ystep, 100, 100);

  fill(200, fillG+(fillstep * 2), 200);
  rect(xpos+(xstep*2), ypos+(ystep*2), 100, 100);

  fill(200, fillG+(fillstep*3), 200);
  rect(xpos+(xstep*3), ypos+(ystep*3), 100, 100);

  fill(200, fillG+(fillstep*4), 200);
  rect(xpos+(xstep*4), ypos+(ystep*4), 100, 100);
}
Try replacing the variable values with other values and see what happens to the
results. (What happens when you replace one of the values with a negative
number, like -25 for xstep?) If you’re having trouble understanding how the
code works, go through each function call and evaluate each expression by hand.
(I.e., what does (xpos+(xstep*4)) evaluate to?)
NOTE:
noStroke()works just likestroke()orstrokeWeight(), except it tells p5.js to omit the stroke (i.e., just don’t draw it). ThenoFill()function does the same thing for the fill color of a shape. Try it out!
Repetition with variation
If you’ve entered into the programmer’s mindset, you might have had a thought about that previous example. “There’s a lot of repetition there,” you probably said to yourself. “I had to type essentially the same thing, multiple times. And typing is for nerds and dorks. Isn’t the whole point of computer programming to save me from having to type things out by hand? I mean, come on. COME ON.”
Let’s write a somewhat simpler example to better illustrate the wanton redundancy. This sketch simply displays five circles, all in a row:
let ypos = 200;
let xpos = 80;
let xstep = 60;

function setup() {
  createCanvas(400, 400);
  noLoop();
}

function draw() {
  background(255);
  fill(50);
  noStroke();

  ellipse(xpos, ypos, 40, 40);
  ellipse(xpos + xstep, ypos, 40, 40);
  ellipse(xpos + (xstep * 2), ypos, 40, 40);
  ellipse(xpos + (xstep * 3), ypos, 40, 40);
  ellipse(xpos + (xstep * 4), ypos, 40, 40);
}
So we’ve drawn five circles, each exactly like the last but with one difference: its X position on the screen. Clear enough, but there are some problems with this approach. Consider:
- What if I wanted to change the number of circles I wanted to draw? Adding one more circle is easy, but what if I wanted to add a hundred, or a million? (That might sound ridiculous right now, but by the end of this course, drawing a million things to the screen will seem like no big deal.)
- What if I wanted to change the diameter of the circles? I could use a variable, of course, but do I really have to use that variable as many times as there are circles? What if I wanted to change the name of that variable later?
- What if I want other attributes of the circle to change in subsequent repetitions, like what happened with the repeated squares example above?
All good questions. Ideally, what we want is a language structure that allows us to tell p5.js that what we want is not just an individual shape, but a whole series of shapes that share particular attributes: a means to communicate the concept of repetition with variation.
You can see that each of those ellipse() lines is basically doing the same
thing, using the same values. To make it a bit more clear, let’s re-write the
example so that every call to ellipse() has some multiplication, not just
the final three:
let ypos = 200;
let xpos = 80;
let xstep = 60;

function setup() {
  createCanvas(400, 400);
  noLoop();
}

function draw() {
  background(255);
  fill(50);
  noStroke();

  ellipse(xpos + (xstep * 0), ypos, 40, 40);
  ellipse(xpos + (xstep * 1), ypos, 40, 40);
  ellipse(xpos + (xstep * 2), ypos, 40, 40);
  ellipse(xpos + (xstep * 3), ypos, 40, 40);
  ellipse(xpos + (xstep * 4), ypos, 40, 40);
}
This code makes it clearer that every call to ellipse() is exactly the
same, except for the number value on the right side of the multiplication
operator. Surely there’s some way to “factor out” this difference between the
lines, to more compactly express this set of instructions. Surely!
The for loop
In fact, there is! The name commonly given to a structure in a programming
language that enables repetition with variation is a loop. (Called a “loop”
because it causes the computer to follow a list of instructions, and then start
again from the beginning, possibly many times.) There are several different
loop structures in Javascript, but the one we’re going to learn first is called
the for loop. The for loop is a very flexible structure that can be used in
different ways, but to start out with we’re only going to use one particular
syntax, and it looks like this:
for (let i = 0; i < times; i++) {
    ... put the thing you want to repeat here ...
}
Replace the word times in the code snippet above with the number of times
you want the contents of the loop to run.
In between the curly braces ({ and }), you should put the statements that
you want to repeat. Wherever you normally would have written a number that was
gradually incrementing, put the variable i instead. (The variable i is
available only inside the for loop.)
This is all very abstract and weird, so here’s an example that puts it into context.
let ypos = 200;
let xpos = 80;
let xstep = 60;

function setup() {
  createCanvas(400, 400);
  noLoop();
}

function draw() {
  background(255);
  fill(50);
  noStroke();

  for (let i = 0; i < 5; i++) {
    ellipse(xpos + (xstep * i), ypos, 40, 40);
  }
}
And just like that, we’ve managed to write two lines of code that do the job
that took five lines of code in the previous example. Not bad! Here’s another
version of the code that draws nine circles, instead of five (I’ve adjusted the
values for xstep and the circle diameters accordingly):
let ypos = 200;
let xpos = 80;
let xstep = 30;

function setup() {
  createCanvas(400, 400);
  noLoop();
}

function draw() {
  background(255);
  fill(50);
  noStroke();

  for (let i = 0; i < 9; i++) {
    ellipse(xpos + (xstep * i), ypos, 20, 20);
  }
}
Play around with this example and see what else you can do. This sketch adds in
some variation on the size of the ellipses, and adds a call to fill() to
change the background color of each shape, and loops up until 12 instead of
just 9:
let ypos = 200;
let xpos = 80;
let xstep = 30;
let hstep = 15;
let fillstep = 20;

function setup() {
  createCanvas(400, 400);
  noLoop();
}

function draw() {
  background(255);
  fill(50);
  noStroke();

  for (let i = 0; i < 12; i++) {
    fill(200, 255-(fillstep*i), 200);
    ellipse(xpos+(xstep*i), ypos, 20, 20+(hstep*i));
  }
}
You can put as many statements inside of a for loop as you’d like. (By
“inside of a for loop” I mean “inside of the curly brackets.”) Each of those
statements will be executed over and over again
EXERCISE: Take one of the examples that uses a
forloop and “unroll” it: write out by hand all of the statements that you would have had to write if the sketch hadn’t used a for loop.
Digging deeper into for
At its core, a for loop is just a way of counting. An easy way to illustrate
this is with console.log(). Put the following code between the { and }
following function setup() in a new sketch and run the sketch:
for (let i = 0; i < 10; i++) {
    console.log(i);
}
The console output should display this:
0
1
2
3
4
5
6
7
8
9
As you can see, this code simply displays the numbers from zero to nine (i.e., ten iterations, starting with 0).
The for loop can also be used to do slightly more sophisticated counting,
using the following code snippet:
for (let i = start; i < end; i += step) {
  ... your statements here ...
}
In the above snippet, perform the following replacements:
start: replace with the value you want the loop to start counting atend: replace with the value you want the loop to stop atstep: replace with how much you want to increment the number between each step
For example, this loop counts from 100 up to (but not including) 300 in steps of 40:
for (let i = 100; i < 300; i += 40) {
  console.log(i);
}
And this one displays all even numbers from 10 up to (but not including) 50:
for (let i = 10; i < 50; i += 2) {
  console.log(i);
}
You can use this format of the for loop to write repetitions without separate
values to keep track of the step. For example:
let origx = 200;
let origy = 100;
let destx = 200;
let desty = 300;
function setup() {
  createCanvas(400, 400);
  noLoop();
}
function draw() {
    background(255);
    fill(255);
    strokeWeight(3);
    for (let i = 25; i < 400; i += 25) {
      stroke(50);
      line(i, 200, origx, origy);
      stroke(240);
      line(i, 200, destx, desty);
    }
}
Nested loops
What if we wanted to draw a grid of circles, instead of just a line of circles? One way, of course, would be to simply copy and paste:
let ypos = 140;
let ystep = 30;
let xpos = 80;
let xstep = 30;
function setup() {
  createCanvas(400, 400);
  noLoop();
}

function draw() {
  background(255);
  fill(50);
  noStroke();

  for (let i = 0; i < 9; i++) {
    ellipse(xpos+(xstep*i), ypos+(ystep*0), 20, 20);
  }
  for (let i = 0; i < 9; i++) {
    ellipse(xpos+(xstep*i), ypos+(ystep*1), 20, 20);
  }
  for (let i = 0; i < 9; i++) {
    ellipse(xpos+(xstep*i), ypos+(ystep*2), 20, 20);
  }
  for (let i = 0; i < 9; i++) {
    ellipse(xpos+(xstep*i), ypos+(ystep*3), 20, 20);
  }
  for (let i = 0; i < 9; i++) {
    ellipse(xpos+(xstep*i), ypos+(ystep*4), 20, 20);
  }
}
But wait. That looks fishy. We’re doing that same thing where we’re repeating
code with just a tiny variation, counting from zero up to another number.
Isn’t this exactly the kind of problem that for loops were designed to solve?
Well, yes. And it turns out that you can put a for loop inside another
for loop, for occasions just like this one. I’m going to take the entire
original loop, and put that inside another loop. When you use a second for
loop, you have to use a different variable from i for the second loop; I’m
going to pick j. Here’s what the code looks like:
let ypos = 140;
let ystep = 30;
let xpos = 80;
let xstep = 30;
function setup() {
  createCanvas(400, 400);
  noLoop();
}

function draw() {
  background(255);
  fill(50);
  noStroke();

  for (let j = 0; j < 5; j++) {
    for (let i = 0; i < 9; i++) {
      ellipse(xpos+(xstep*i), ypos+(ystep*j), 20, 20);
    }
  }
}
NOTE: The number of circles drawn is exactly 45—i.e., 5 times 9. Explain in your own words why this is the case.
EXERCISE: Take the example above and add further variation based on the loop variables
iandj. Change the fill color, the stroke, the size of the circles, etc.!