Media
In this tutorial, I’m going to show you how to load pre-existing media into your sketches.
Images
It’s easy to load and display an image in p5.js. For the following example, you’ll need to find an image in PNG or JPEG format. (If you’re planning on making something that you’ll later share with others, ensure that you have rights to use the image. Creative Commons Search is a good place to look for images with permissive licenses.)
In order to use your image in your p5.js sketch, you need to copy it to the
sketch folder. The easiest way to do this is through the p5.js editor: from the
menu, select View > Show Sketch Folder. You can then use Finder (or whichever
file management utility of your choice) to copy the image into that folder.
Remember the name of the file: you’ll have to use it when you’re writing the sketch.
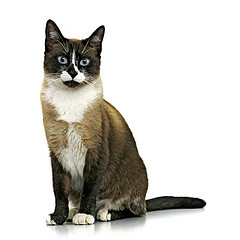
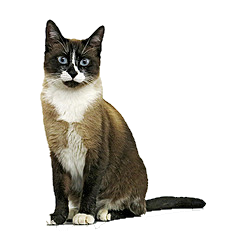
In the following example, I’m using an image called kitty.jpg, which you can
download here. (Image
source, used under the
CC BY 2.0 license.)
let kitty;
function preload() {
  kitty = loadImage("kitty.jpg");
}
function setup() {
  createCanvas(400, 400);
}
function draw() {
  background(255);
  image(kitty, mouseX, mouseY);
}
And we have a kitty that follows the mouse around!
There are a few new functions and concepts in this example that are worth
looking at in more detail. The first is the preload() function. This is a
function, like setup() and draw(), that you define in your sketch and that
is then called by p5.js automatically. The code in preload() gets run
before setup() or draw() gets called, and generally it’s used to load any
images (or other media) that you’re going to use in your sketch, in order to
guarantee that those images have been successfully loaded before the rest of
the sketch proceeds.
The loadImage() function. This is the
function that gets the data from the image and makes it available inside of
your sketch. The function doesn’t draw anything to the screen: it returns the
image data in a special kind of Javascript value called an object. This
statement:
kitty = loadImage("kitty.jpg");
… assigns that object value to the variable kitty. (There’s nothing
special about the variable name kitty here—it happens to match the filename
of the image, but you don’t have to do that if you don’t want to. The variable
can be named anything you want!)
In order to keep our program clean and ensure that the kitty variable is
available to the draw() function, I declared the kitty variable before
preload() or setup(). This variable declaration is a little strange, since
I didn’t actually assign a value to the variable when I declared it. This is
the equivalent of telling Javascript: “Hey, I’m going to use a variable called
kitty later—just a heads-up.” (More details about this below.)
Finally, to actually draw the image to the screen, I called the image()
function inside draw(). The image() function takes at least three
parameters: the first is the image object that you want to draw, and the second
and third specify the X and Y coordinates of where the image should be drawn.
The image() function is a bit more versatile than this, however. You can add
a fourth and fifth parameter to specify how wide and how high (in pixels) to
draw the image to the screen. Also, Processing has an imageMode() function,
analogous to the the rectMode() function, that allows you to make it so the
image’s center is drawn at the X/Y coordinates specified in the call, instead
of the upper left-hand corner. Here’s a sketch that illustrates both of these
features:
let kitty;
function preload() {
  kitty = loadImage("kitty.jpg");
}
function setup() {
  createCanvas(400, 400);
}
function draw() {
    background(255);
    imageMode(CENTER);
    image(kitty, mouseX, mouseY,
        200+sin(frameCount*0.1)*100,
        200+cos(frameCount*0.1)*100);
}
The possibilities… are endless.
Preload, setup and draw
You might be asking: why not just write this as the first line of the program?
let kitty = loadImage("kitty.jpg"); // doesn't work!! whyyyyy
That is: why not just call the loadImage() function when we’re declaring the
variable? This would be tidy and neat, but unfortunately it won’t work. That’s
because some functions (including most of the load...() functions I discuss
in this tutorial) can only be called from inside preload(). The reasons for
this are tied to the specific ways that p5.js is implemented and aren’t
necessarily worth going into, but it’s a good thing to remember.
Well, okay. Technically you can call loadImage() in other contexts, and
often you’ll see people call it inside of setup() as a kind of shorthand.
But one thing you don’t want to do is call loadImage() in draw(). Here’s a
simple sketch to illustrate why:
// this sketch illustrates how NOT to load an image. please see accompanying
// tutorial!!
let kitty;
function setup() {
  createCanvas(400, 400);
}
function draw() {
  kitty = loadImage("kitty.jpg");
  background(255);
  image(kitty, mouseX, mouseY);
}
Depending on your computer, one of several things might happen when you run
this sketch. For me: it looks like nothing happens. That’s because p5.js runs
the draw() function many dozens of times every second, which means that a
single run of draw() might only take a hundredth of a second. Loading an
image, on the other hand, even a small image, can take much longer—on the
order of half a second. So what happens in the sketch above is this: we told
p5.js to load the image, but before the image even gets loaded, we tell it to
load the image again. Consequently, no image ever gets displayed!
The thing to remember is that if you call loadImage() anywhere other than
inside of preload(), p5.js will to run your sketch even before the
image is loaded. This means that certain attributes of the image (like its
width or height or pixel data) might not be available in your program until
after the draw() function has already been called a few times. For this
reason, it’s always safer to use preload().
Multiple images
You’re not limited to a single image. In fact, you can create as many variables
to store images as you’d like. You just need to remember to load in the images
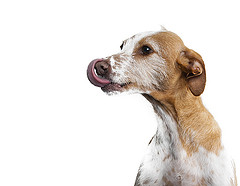
in setup(). In this example, our cat is transformed into a dog when the mouse
is pressed. (I’m using this image, originally from
here, again under a CC BY
2.0 license.)
let kitty;
let doggy;
function preload() {
  kitty = loadImage("kitty.jpg");
  doggy = loadImage("doggy.jpg");
}
function setup() {
  createCanvas(400, 400);
}
function draw() {
    background(255);
    imageMode(CENTER);
    if (mouseIsPressed) {
        image(doggy, mouseX, mouseY,
            200+sin(frameCount*0.1)*100,
            200+cos(frameCount*0.1)*100);
    }
    else {
        image(kitty, mouseX, mouseY,
            200+sin(frameCount*0.1)*100,
            200+cos(frameCount*0.1)*100);
    }
}
Alpha channels
The images I’ve shown you so far have been in JPEG format. Images in JPEG format are compressed and are generally of high quality while having a small file size. A limitation of the JPEG format is that it doesn’t store transparency. An easy way to illustrate this is by displaying the same kitty image twice:
let kitty;
function preload() {
  kitty = loadImage("kitty.jpg");
}
function setup() {
  createCanvas(400, 400);
}
function draw() {
    background(255);
    imageMode(CENTER);
    image(kitty, 200+sin(frameCount*0.05)*100,
        200+cos(frameCount*0.05)*100);
    image(kitty, 200+cos(frameCount*0.06)*100,
        200+sin(frameCount*0.06)*100);
}
You can see that when one kitty gets drawn on top of the other, the entire rectangle of the image gets drawn. Which is maybe okay for some purposes, but not what we expected.
In order to help you understand how to draw images with a transparent background, I need to introduce the concept of the alpha channel. The alpha channel is a fourth bit of information stored in a pixel, along with its red/green/blue value, that determines how transparent a pixel should look on the screen. An alpha value of 255 is entirely opaque, and an alpha value of 0 is totally transparent. The commands we’ve used so far to control color actually all support a fourth parameter to control this. Here’s an example:
function setup() {
  createCanvas(400, 400);
}
function draw() {
    background(255);
    rectMode(CENTER);
    noStroke();
    // opaque red rectangle
    fill(240, 50, 50);
    rect(width/2, height/2, 300, 300);
    // vary alpha value of blue rectangle
    fill(50, 50, 240, 128+sin(frameCount*0.05)*128);
    rect(mouseX, mouseY, 100, 100);
}
In this example, the fourth parameter to fill() controls how transparent the
fill color is. (The expression with sin() uses the frame count to slowly
oscillate this value.)
Transparent PNGs
There’s another image format, called PNG, which does store transparency information. In a PNG, every pixel in the data has a value for its red, blue, and green amounts, and then an extra value (the alpha channel) for its transparency. Many PNGs you’ll find on the Internet already have transparency information; for example, here’s a sketch using an image of a Filet-O-Fish that I found on Wikimedia Commons:
let img;
function preload() {
    img = loadImage("filetofish.png");
}
function setup() {
    createCanvas(400, 400);
}
function draw() {
    imageMode(CENTER);
    image(img, random(width), random(height),
        random(25,150), random(25,150));
}
This is nice, but what about our kitties? Unfortunately, turning a JPEG with a sort-of-plain background into a PNG with a transparent background isn’t as simple as opening the JPEG in an image editing program and saving it as a PNG. You need to manually remove the background. Removing backgrounds from images is a fine art and there are many tutorials about the process on the web. I’ve taken the liberty of (poorly) removing the background from our kitty image so that this section of the tutorial has a proper denouement. Here is the resulting image.
Here’s the same sketch as above, but with the transparent kitty PNG (and a solid color background!)
let kitty;
function preload() {
  kitty = loadImage("kitty_transparent.png");
}
function setup() {
  createCanvas(400, 400);
}
function draw() {
  background(50, 50, 240);
  imageMode(CENTER);
  image(kitty, 200+sin(frameCount*0.05)*100,
    200+cos(frameCount*0.05)*100);
  image(kitty, 200+cos(frameCount*0.06)*100,
    200+sin(frameCount*0.06)*100);
}
Working with image data
You can do more with an image object than just display it to the screen. Image objects come with a few bits of associated data, and some associated functions, that allow you to read and manipulate the data inside the image in interesting ways.
You can get an image’s width and height by accessing its width and height
attributes. An object’s attributes are special values belonging to that
object that are accessed by putting a dot (.) after the object’s variable
name, and the name of the attribute after the dot. Assuming you’d already used
loadImage() to load an image object into a variable called img, you would
access that image’s width and height like so:
img.width
img.height
In the following sketch, I’m drawing ten copies of of the same kitty image, increasing their size proportionally by writing expressions with the image’s width and height:
let kitty;
function preload() {
  kitty = loadImage("kitty_transparent.png");
}
function setup() {
  createCanvas(400, 400);
}
function draw() {
  background(50, 50, 240);
  for (let i = 0; i < 10; i++) {
    image(kitty, (i*25), (i*25),
      kitty.width*(i+1)/10,
      kitty.height*(i+1)/10);
  }
}
Every image object also supports a method called .get(), which takes two
parameters, an X and a Y coordinate, and returns the color at that
coordinate. Call this method like so:
img.get(x, y)
NOTE: A method is a special kind of function that is associated with a type of value. The image objects that
loadImage()returns, for example, have their own “library” of code snippets, called “methods,” that go along with each individual object. These code snippets are just like functions, except they specifically reference the data contained inside of the objet they’re associated with, and have to be called using a special syntax. We’ll discuss methods and attributes more when we talk about object-oriented programming.
In order to use .get(), you must first call the image’s .loadPixels()
method. The best place to do this is inside of .setup().
Here’s an example that uses .get() to make a canvas where you “draw” an
underlying image with the rect() command by accessing the color of the pixel
at the current mouse position. (The image I
used
is a stunningly beautiful photography of Pluto’s moon Charon taken by the New
Horizons probe.)
let charon;
function preload() {
  charon = loadImage("charon.jpg");
}
function setup() {
  createCanvas(400, 400);
  charon.loadPixels();
  background(0);
  noStroke();
  rectMode(CENTER);
}
function draw() {
  // set fill to color in image at mouse position
  // with a lower alpha to make it painterly
  fill(charon.get(mouseX, mouseY), 128);
  rect(mouseX, mouseY, 40, 10);
}
Another classic Processing example is to use the pixel data from an image to
create a mosaic. Here’s the same image of Charon drawn in chunks using a nested for
loop:
let charon;
let gridx = 25;
let gridy = 25;
function preload() {
  charon = loadImage("charon.jpg");
}
function setup() {
  createCanvas(400, 400);
  noLoop();
  charon.loadPixels();
  background(0);
  rectMode(CENTER);
  noStroke();
}
function draw() {
  for (let i = 0; i < gridx; i++) {
    for (let j = 0; j < gridy; j++) {
      fill(
        charon.get(
          i*(width/gridx),
          j*(height/gridy)
        )
      );
      push();
      translate(i*(width/gridx), j*(height/gridy));
      if (((i+j) % 2) == 0) {
        ellipse(0,0,(width/gridx),(height/gridy));
      }
      else {
        rect(0,0,(width/gridx),(height/gridy));
      }
      pop();
    }
  }
}
NOTE: The arithmetic’s a little complicated with this one. If you’re confused about what’s going on, try working out what the expressions in the
draw()function would evaluate to for a few different values ofiandj. Draw it out by hand if you need to!
Sounds
It’s also easy to make your p5.js sketches play sounds! In this section, I’ll take you through the basics of how to make this happen.
The basic workflow of using a sound file in a p5.js sketch looks a lot like using an image: find the sound that you want to use, copy it to your sketch folder, and then load the sound file data inside the sketch.
Sound formats
For simplicity’s sake, all of the example audio files in this section will be in MP3 format. But you should be aware that not every web browser supports MP3. In particular, MP3 support in Firefox is operating-system dependent. This example sketch in the p5.js reference shows how you can provide your audio files in different formats for maximum cross-platform compatibility.
Loading and playing a sound
The basic workflow of using a sound file in a p5.js sketch looks a lot like using an image: find the sound that you want to use, copy it to your sketch folder, and then load the sound file data inside the sketch.
You need to create an empty variable to hold the sound object, and then use the
loadSound() function in preload() to load the data and assign the variable
to the object. Once you’ve done so, you can call the object’s .play() method
inside of draw() in order to trigger the sound. Here’s an example, using
this audio file
(source).
let kitty;
let meow;
function preload() {
  kitty = loadImage("kitty.jpg");
  meow = loadSound("meow.mp3");
}
function setup() {
  createCanvas(400, 400);
}
function draw() {
  background(255);
  imageMode(CENTER);
  image(kitty, width/2, height/2);
  if (frameCount == 30) {
    meow.play();
  }
}
Cats should not be robots
The example above called the .play() function when the frameCount variable
reached 30, so that the audio snippet plays shortly after the sketch starts
running. What if we wanted to trigger the file to play whenever the mouse is
pressed? You might think you could do it like this:
let kitty;
let meow;
function preload() {
  kitty = loadImage("kitty.jpg");
  meow = loadSound("meow.mp3");
}
function setup() {
  createCanvas(400, 400);
}
function draw() {
  background(255);
  imageMode(CENTER);
  image(kitty, width/2, height/2);
  if (mouseIsPressed) {
    console.log("play!");
    meow.play();
  }
}
But that does something weird. The kitty sounds robotic or something. What
gives? I put the console.log() function in there in order to give you a clue:
you can see that it prints multiple times whenever the mouse is pressed.
That’s because draw() runs over and over again, many times a second, while a
common mouse click lasts for (let’s say) a half second or so. That means that
the audio file will be triggered with play() many times over the course of
a single mouse press. (This is what gives it the metallic quality; the sample
is being triggered over itself, making it sound like an echo in a very small
metal can.)
Clearly, we need some way to trigger the sample when a mouse button is pressed,
but only when the mouse is first pressed and not subsequently during the same
press. One way to do this would be with the sound object’s .isPlaying()
method, which returns true if the sound is playing, and false if not:
let kitty;
let meow;
function preload() {
  kitty = loadImage("kitty.jpg");
  meow = loadSound("meow.mp3");
}
function setup() {
  createCanvas(400, 400);
}
function draw() {
  background(255);
  imageMode(CENTER);
  image(kitty, width/2, height/2);
  if (mouseIsPressed) {
    // only trigger the sound if the mouse
    // is pressed and the sound isn't
    // already playing
    if (meow.isPlaying() == false) {
      console.log("play!");
      meow.play();
    }
  }
}
Hey! It works!
Event functions
Another approach would be to use a feature of p5.js that we haven’t yet
discussed: event functions. These are functions that you can define in your
program that p5.js will call when some external event happens. The p5.js
reference has a full list, but the
simplest to understand is mousePressed(). If you define a function called
mousePressed() in your sketch, p5.js will call it whenever the person using
your sketch presses the mouse button. The benefit of mousePressed() for our
purposes is that it only gets called once per mouse press!
Here’s the example above, reworked to use mousePressed():
let kitty;
let meow;
function preload() {
  kitty = loadImage("kitty.jpg");
  meow = loadSound("meow.mp3");
}
function setup() {
  createCanvas(400, 400);
}
function draw() {
  background(255);
  imageMode(CENTER);
  image(kitty, width/2, height/2);
}
function mousePressed() {
  meow.play();
}
Another event function that may be useful is keyTyped(). This function gets
called whenever a key is pressed. Here’s the same sketch as above, but the
sound is triggered by a keypress instead of a mouse click. (You may need to
click inside of the sketch to give it focus for your keypresses to have any
effect.)
let kitty;
let meow;
function preload() {
  kitty = loadImage("kitty.jpg");
  meow = loadSound("meow.mp3");
}
function setup() {
  createCanvas(400, 400);
}
function draw() {
  background(255);
  imageMode(CENTER);
  image(kitty, width/2, height/2);
}
function keyTyped() {
  meow.play();
}
A simple drum kit
Inside of the keyTyped() function, a special variable named key contains
the current key being pressed. To check to see if a particular key is being
pressed, use the following expression:
key == "X"
… where X is the key you want to check for (make sure to keep the quotes!).
The following sketch exploits this functionality to create a simple keyboard-controlled drum kit. (“A” is the kick drum; “L” is a closed hihat; “S” is the snare drum. Any other key makes a meow.)
let kitty;
let meow;
let kick;
let snare;
let hihat;
let extraScale = 0;
function preload() {
  kitty = loadImage("kitty.jpg");
  meow = loadSound("meow.mp3");
  kick = loadSound("kick.mp3");
  snare = loadSound("snare.mp3");
  hihat = loadSound("hihat.mp3");
}
function setup() {
  createCanvas(400, 400);
}
function draw() {
  background(255);
  imageMode(CENTER);
  translate(width/2, height/2);
  scale(1 + extraScale);
  image(kitty, 0, 0);
  if (extraScale > 0) {
    extraScale -= 0.05;
  }
}
function keyTyped() {
  extraScale = 1;
  if (key == "a") {
    kick.play();
  }
  else if (key == "l") {
    hihat.play();
  }
  else if (key == "s") {
    snare.play();
  }
  else {
    meow.play();
  }
}
Uploading sketches that use media
When you’re uploading your sketches to the Internet, make sure to upload your
media files as well! They need to be in the same folder as your index.html
file. If something doesn’t work, check the Javascript Console in your browser
(in Chrome, View > Developer > Javascript Console) for error messages.
Also, make sure that you upload the p5.sound.js file along with your sketch
(in the libraries folder). This should happen by default if you’re using the
files produced by the p5.js IDE, but if you’re not using the IDE, you may need
to upload it manually.
Further reading
- The p5.sound library
documentation has a complete reference. In particular, the
p5.SoundFile page shows you all
of the methods you can use with the sound objects returned from
loadSound(). - See the “Sound” examples at the p5.js examples page for examples of how to do more sophisticated things with sound files, such as filtering and frequency analysis.